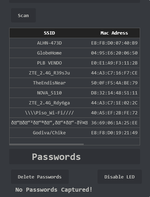
MaskFi – WiFi Security Awareness & Testing Tool
- MaskFi is an advanced penetration testing tool designed to simulate WiFi security vulnerabilities by leveraging techniques such as deauthentication attacks, rogue access points, and captive portals. By creating deceptive networks, it allows cybersecurity professionals and ethical häçkers to assess how attackers can exploit unsecured WiFi networks and s†éál sensitive information.
Deauthentication Attack – Disconnects users from legitimate networks to force reconnections.
Rogue AP Simulation – Creates a fake WiFi hotspot to mimic trusted networks.
Captive Portal Phishing – Redirects users to a controlled login page for credential harvesting awareness.
Packet Monitoring & Analysis – Helps identify security flaws in network traffic.
This project is strictly for educational and security awareness purposes. MaskFi is intended to help users understand the importance of WiFi security and how attackers exploit weak networks. Unauthorized use of this tool on networks you do not own or have explicit permission to test is îllégâl and unethical. The responsibility lies with the user to comply with ethical häçking laws and responsible disclosure policies.
Stay safe. Stay ethical. Learn to secure.
How to Use MaskFi
MaskFi is a WiFi security testing tool designed to demonstrate vulnerabilities in wireless networks using techniques like deauthentication attacks, rogue access points, and captive portals. Follow these steps to configure and run MaskFi effectively.
1. Open MaskFi
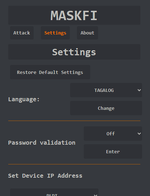
Run the tool on a compatible system and navigate to the Settings menu to configure the attack parameters.
2. Configure Settings
Language: Select your preferred language.
Password Validation: Toggle password validation to ON to enable login security checks.
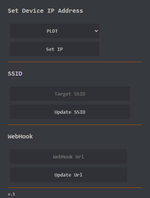
Set Device IP Address: Choose a network provider or manually set an IP address.
SSID Selection: Enter the target SSID of the network you want to simulate or attack.
Webhook URL: If using an external logging system, enter a valid webhook URL for capturing data.
3. Start an Attack
Navigate to the Attack tab and select the type of test you want to perform:
Deauthentication Attack: Disconnects users from a network, forcing them to reconnect.
Rogue AP Simulation: Creates a fake WiFi hotspot mimicking the target SSID.
Captive Portal Phishing: Redirects users to a controlled login page to demonstrate credential interception risks.
4. Monitor and Analyze
Once the attack is running, monitor the results through the logs. Ensure all tests are conducted ethically and with permission.
5. Restore Default Settings (Optional)
If you need to reset configurations, click "Restore Default Settings" to revert all changes.
Tagalog
Paano Gamitin ang MaskFi para sa WiFi häçking (ESP8266 Deauth & Captive Portal)
Sundin ang mga hakbang na ito upang i-setup at gamitin ang MaskFi sa iyong ESP8266:
1. I-on ang ESP8266**
- Ikonekta ang ESP8266 sa power source gamit ang USB cable na nakakabit sa power bank o charger (huwag lalagpas sa 5V).
2. Kumonekta sa WiFi**
- Hanapin ang WiFi network na may pangalan "GHZ-001" at kumonekta rito.
3. I-access ang Dashboard**
- Buksan ang iyong web browser at pumunta sa 192.168.1.1/dashboard (default para sa PLDT routers).
4. Palitan ang SSID**
- Pumunta sa Settings at itakda ang SSID na kapareho ng target network.
5. Simulan ang Pag-atake**
- Pumunta sa Attack section at piliin ang SSID Deauth upang i-disconnect ang mga device mula sa target network.
6. Subaybayan ang Resulta**
- Makikita mo ang real-time output ng pag-atake sa dashboard.
Kung gusto mong makuha ang password ng target nang isang beses lang, i-disable ang Password Validation sa settings. Maaari mo rin itong subukan sa sarili mong device sa pamamagitan ng pag-access sa 192.168.1.1.
Requirements
ESP8266: https://shopee.ph/ESP8266-Wireless-...4?sp_atk=5e1da187-e3a7-4818-99af-aad1f89096c3
DUPONT FEMALE WIRE: https://shopee.ph/10CM-20CM-30CM-40...8?sp_atk=503f4732-0cd5-43ff-b126-e967c6b329ae
main.bin (for ESP8266 MAIN
- base.bin (for ESP8266 BASE)
 USB Cable (for flashing)
Step-by-Step Flashing Guide
1. Install NodeMCU PyFlasher
Open PyFlasher2. Connect ESP8266 to Your Computer
- Use a USB-to-Serial adapter or a direct USB connection.
- Ensure the ESP8266 is in flashing mode:
- Hold the Flash button while pressing Reset (if needed). optional only
3. Open PyFlasher and Configure Settings
- Select the correct COM Port (e.g., COM3).
- Click Browseand select the firmware file:
- - main.bin for ESP8266 MAIN
- - base.bin for ESP8266 BASE
- Set the following flashing configurations:
- Baud Rate: 115200
- Flash Mode: Dual I/O (DIO)
- Erase Flash: Wipe All Data
4. Flash the Firmware
- Click Flash NodeMCU and wait for the process to complete.
- Once done, disconnect and reconnect your ESP8266.
Default IP: 192.168.1.1/dashboard
V1 TeleBox
V2 Telebox
DIAGRAM

screenshots


Telegram: @snistertech
Last edited:


